
Cracked render is an all-too-common problem that can cause a real eye-sore on your property. In this guide we are going to cover everything you need about cracked render, how to repair it & how to prevent it from happening again, so you can go back to having a crack-free home.
What Is Render?
Render is an increasingly common form of exterior finish in the UK. It comes in various forms, from traditional sand & cement render to more modern renders such as k-rend.
The purpose of rendering is two-fold. Firstly, it is to give the outside of a property a clean, attractive finish. Secondly, render gives the property protection from the elements, ensuring the underlying brickwork is not damaged by the impact of constant weathering.
Why Does Render Crack?
As with any exterior surface, there are a number of factors that may cause render to crack over time. This can occur as early as the application process with water evaporating from the render too quickly. This can lead to not enough time being given for the render to bond effectively with the exterior wall before it dries.
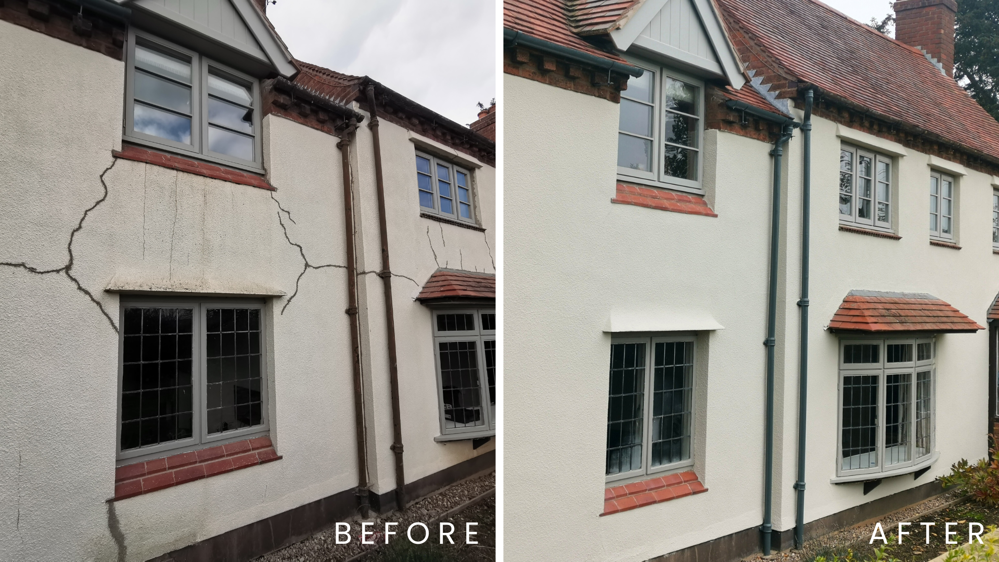
One of the most common causes of cracked render is weathering. Wind, rain and variations in temperatures all significantly impact the integrity of external render. The single biggest cause of cracked render is moisture becoming trapped between the render and the external wall. Caused by some either the render absorbing wind-driven rain or by small hairline cracks allowing the moisture to enter the render. Once behind the rendering, it is only a matter of time before further damage is caused.
When the moisture undergoes a freeze-thaw-cycle, the water expands which causes render to bulge and lift from the exterior wall. This then allows more moisture to enter through the render, causing even larger cracks and further water ingress.
Furthermore, when the moisture becomes trapped behind the surface, it can cause water ingress on the internal wall of solid wall properties, causing internal damp. This is because in solid wall properties there is no cavity wall to stop the transfer of moisture from external wall to the internal wall. This can also occur in properties with a cavity-wall when the cavity-wall is blocked with debris that creates a bridge for moisture to soak into the internal wall.
Once any cracks begin to appear on render, you must act quickly in order to limit the damage caused both internally & externally to your home.
How To Repair Cracked Render
If you are looking to repair cracked render yourself at home, it is important that you follow a step-by-step process carefully to ensure you achieve results that will last long-term.
WHAT YOU WILL NEED:
- A mini-disk cutter or oscillating tool
- Exterior filler (small areas)
- Render mix (large areas)
- A wire brush
- Sandpaper
- Filling knife
- Masonry cleaner
- Power washer (if possible)
1. IDENTIFY THE DAMAGE
The extent of the repairs you will need to make depends on the current state of the render. If there are just a number of small hairline cracks, an exterior filler will be suitable for making repairs. If you have large open sections of render missing, these will have to re-rendered using a suitable render mix. It is important to match the repairing render to the current render on your property, so establishing this should be your first port of call.
There might be sections of render that while appears to be bonded to the exterior wall, is in fact bulging & lifted from the external wall. To establish whether any render needs to be removed, tap on the surface. If you can hear that it is hollow, you must remove this as eventually this will completely fail if repairs are not made.
2. CLEAN THE SURFACE
Before any repairs are made to the render, you must ensure the surface is clean. Apply a suitable exterior masonry cleaning solution that contains a fungicide to the render and leave for a minimum of two hours, in order to remove any algae or other green growth. The area can then be washed down using a low-pressure washer.
3. OPEN UP CRACKS
While it may seem counter-productive, you must make certain cracks larger in order to properly repair them. This is because small hairline cracks do not allow the filler to grip the inside of the crack, causing it to fail. Using a suitable tool such as a mini-disk cutter, run a cut through each crack. Once each crack is enlarged, you can then remove any dust using a wire brush. It is important that the surface is completely clean before you continue as any rumble and dust will impact the ability for the filler to perform.
4. FILL THE CRACKS
It is now time to repair the cracks. You can use any suitable exterior filler to repair cracks, either using a filling knife or an applicator gun. Using an applicator gun & a masonry filler that comes in a tube may be the best option if you have deep cracks, as this will allow you to apply the filler into the crack itself.
If using a filling knife, work the filler back and forth to fill the hole as much as possible. Slightly overfilling the hole can help counter any shrinkage as the filler dries.
5. SANDING
Once the filler has completely dried, use a filling knife to remove any large chunks of filler. Once you have done this, you can then use sandpaper to sand the filler back to a smooth edge.
How To Prevent Render From Cracking
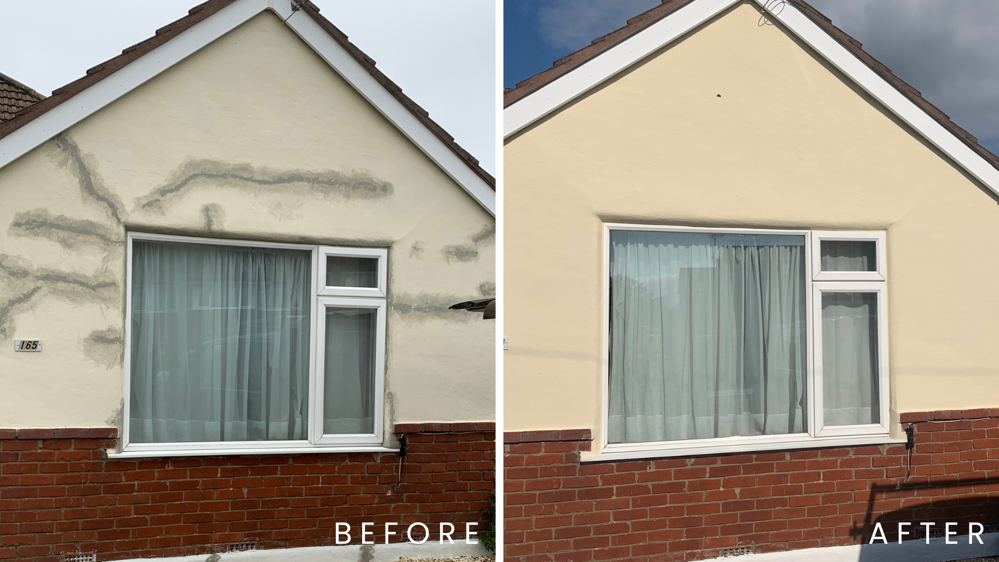
Once you have repaired your render, the chances are you don't want the same thing to happen again. To prevent hairline cracks from opening again, you must prevent the root cause of the problem. If this is water ingress, then using a waterproof masonry paint is your best option. Contrary to popular belief, standard masonry paint (which are acrylic-based) absorb moisture rather than repel it. This causes the paint to uptake moisture, which only increases the chances of moisture getting between the external wall and the render. Waterproof masonry paint is designed to repel water, creating a protective barrier on external walls that keeps them dry & free from water ingress.
Here at Emperor Paint we developed our masonry paint using the latest nano-technology, which creates a super hydrophobic surface on exterior walls. This super hydrophobic technology repels water, meaning instead of being absorbed into building materials, it simply rolls off the surface. This coupled with high breathability mean that render treated with Emperor Masonry Paint is protected from the weathering that the elements can cause.
In a 25 year weathering test conducted by independent UKAS accredited laboratory Lucideon, Emperor Masonry Paint showed no signs of deterioration in performance or appearance. We are so confident our masonry paint will exceed this, we offer a lifetime guarantee, ensuring it's performance in all weather conditions.
Emperor Masonry Paint is suitable for use on any exterior render, including silicone-based renders such as k-rend.
If you are looking to paint you render once you have repaired any cracks, why not read our full guide to painting masonry?
How To Disguise Repairs
Due to this, we developed Emperor Textured Basecoat which can create a wide range of textured finishes quickly and easily using a brush or textured roller. Once any repairs are made, such as filling holes, simply roll over the surface with either a light, medium or rough textured roller with Emperor Textured Basecoat.
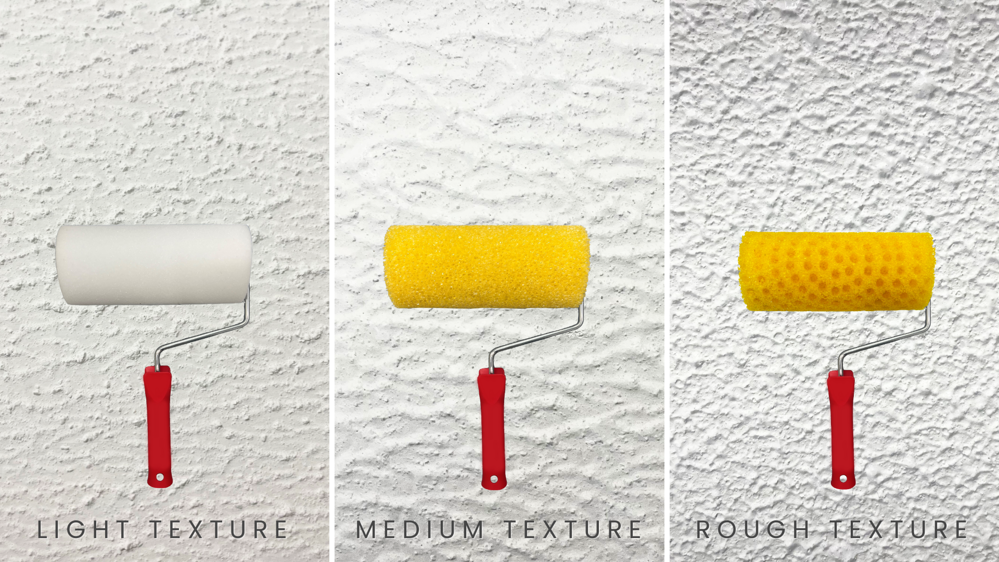
The specially designed rollers will create the texture themselves, allowing you to match the repair and blend them with the existing render. Crucially, the basecoat is highly breathable and fully compatible with Emperor Masonry Paint, so you aren't compromising the performance of your walls and ensuring full breathability is maintained.
Frequently Asked Questions
Q. DO I NEED TO PRIME SURFACES BEFORE APPLYING EMPEROR TEXTURED BASECOAT?
If you are applying Emperor Textured Basecoat and/or Emperor Masonry Paint to a bare, unpainted render, you need to apply Emperor Masonry Primer first. You do not need prime if the render is pre-coloured or if the render has been painted before.
Q. WHAT IS BREATHABILITY AND HOW DOES IT WORK?
Breathability is a term that many people are confused with when it comes to exterior paints & renders. Breathability is crucial for ensuring that the interior of the property can release moisture that naturally builds up from condensation. This means that while preventing moisture entering the building is crucial, allowing moisture to release from the building is even more important, as if it is blocked it will cause significant damage to the building materials and leads to huge damp problems. This is why any paint or render must be breathable to allow this moisture to escape. Breathability is measured with an SD value, with anything under 1 being considered breathable. Emperor Masonry Paint has a breathability rating of 0.03, making it highly breathable, which is why it is ideal for use on any exterior surface.
Have any more questions regarding repairing cracked render? Our team of experts is on hand to assist you with any questions you may have. Talk to one of our experts today or find out more about Emperor Masonry Paint. Alternatively, order Emperor Masonry Paint today & get free delivery on all orders.